1.环境准备
内存>=2GB 通常设置4GB
4vCPUs/4GB/100G硬盘
主备各一台,客户机一台,配置好docker环境,配置如下
| 名称 | IP |
| harbor01 | 192.168.67.130 |
| harbor02 | 192.168.67.131 |
| web01 | 192.168.67.140 |
2.资源包下载
在harbor01和harbor02上操作
官网:https://github.com/goharbor/harbor
已下载好的2.14.0版本:
或者直接使用下方命令下载到实验环境内
yum install -y wget && wget https://down.b52m.cn/d/test/harbor/harbor-offline-installer-v2.14.0.tgz3.安装
在harbor01、harbor02和web01上操作
如果需要使用域名,可以设置hosts映射(可选)
cat >> /etc/hosts << EOF
192.168.67.130 harbor01.my.com
192.168.67.131 harbor02.my.com
192.168.67.140 web
EOF
安装基础软件包(可选)
yum install -y wget net-tools nfs-utils lrzsz gcc gcc-c++ make cmake libxml2-devel openssl-devel curl curl-devel unzip sudo ntp libaio-devel wget vim ncurses devel autoconf automake zlib-devel python-devel epel-release openssh-server socat ipvsadm conntrack在harbor01和harbor02上操作
创建安装目录
mkdir /data/install -p && cd /data/install/将上传/下载好的包解压到当前目录
tar -zxvf /root/harbor-offline-installer-v2.14.0.tgz进入解压目录
cd /data/install/harbor复制配置文件
cp harbor.yml.tmpl harbor.yml修改配置文件
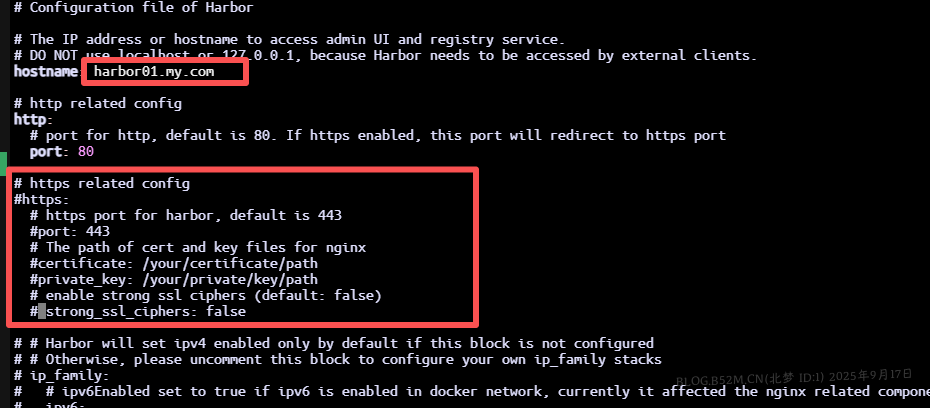
vim harbor.yml修改hostname为自己的
![图片[1]-Harbor-主从搭建 – 北梦の博客-北梦の博客](https://wpstatic.b52m.cn/wp-content/uploads/2025/09/8137221446571649fab7cb47900be9dd.png)
安装服务
./install.sh[root@harbor01 harbor]# ./install.sh
[Step 0]: checking if docker is installed ...
Note: docker version: 26.1.4
[Step 1]: checking docker-compose is installed ...
Note: Docker Compose version v2.27.1
[Step 2]: loading Harbor images ...
5dd32317cf96: Loading layer [==================================================>] 40.82MB/40.82MB
e959dc37d186: Loading layer [==================================================>] 16.49MB/16.49MB
2cd016989b45: Loading layer [==================================================>] 175.3MB/175.3MB
c477c7fe5160: Loading layer [==================================================>] 26.59MB/26.59MB
14b19a3a10a0: Loading layer [==================================================>] 18.59MB/18.59MB
d05ad82c41db: Loading layer [==================================================>] 5.12kB/5.12kB
1c14d9a1a9c0: Loading layer [==================================================>] 6.144kB/6.144kB
04b0441a1d4d: Loading layer [==================================================>] 3.072kB/3.072kB
19378685fc53: Loading layer [==================================================>] 2.048kB/2.048kB
26781eaaebd9: Loading layer [==================================================>] 2.56kB/2.56kB
5db0caa837d5: Loading layer [==================================================>] 14.85kB/14.85kB
Loaded image: goharbor/harbor-db:v2.14.0
5d851e2a1093: Loading layer [==================================================>] 125.2MB/125.2MB
343ea1f9f01a: Loading layer [==================================================>] 3.584kB/3.584kB
f494fdbb1706: Loading layer [==================================================>] 3.072kB/3.072kB
daed9a74821e: Loading layer [==================================================>] 2.56kB/2.56kB
f2d7c23374ea: Loading layer [==================================================>] 3.072kB/3.072kB
68170287aff9: Loading layer [==================================================>] 3.584kB/3.584kB
111f5dc74343: Loading layer [==================================================>] 20.48kB/20.48kB
Loaded image: goharbor/harbor-log:v2.14.0
a76efeb95db6: Loading layer [==================================================>] 9.162MB/9.162MB
3b3f22ce738a: Loading layer [==================================================>] 4.096kB/4.096kB
1a843a98313c: Loading layer [==================================================>] 3.072kB/3.072kB
d0d666c85032: Loading layer [==================================================>] 155.3MB/155.3MB
f26e603cbfeb: Loading layer [==================================================>] 16.49MB/16.49MB
cf96ac74f5f4: Loading layer [==================================================>] 172.6MB/172.6MB
Loaded image: goharbor/trivy-adapter-photon:v2.14.0
1bd3ff6de6c7: Loading layer [==================================================>] 16.49MB/16.49MB
48e35ad952ee: Loading layer [==================================================>] 110.5MB/110.5MB
e3140dab4118: Loading layer [==================================================>] 3.072kB/3.072kB
7f1e309cfc13: Loading layer [==================================================>] 59.9kB/59.9kB
87a5ef88148b: Loading layer [==================================================>] 61.95kB/61.95kB
Loaded image: goharbor/redis-photon:v2.14.0
d3dda50ad797: Loading layer [==================================================>] 112.3MB/112.3MB
Loaded image: goharbor/nginx-photon:v2.14.0
a527857ee623: Loading layer [==================================================>] 8.661MB/8.661MB
8c4ac2a0acab: Loading layer [==================================================>] 4.096kB/4.096kB
ad50297b7979: Loading layer [==================================================>] 3.072kB/3.072kB
a3691511d386: Loading layer [==================================================>] 18.96MB/18.96MB
3d88da6fc880: Loading layer [==================================================>] 19.76MB/19.76MB
Loaded image: goharbor/registry-photon:v2.14.0
b5e4ded37c34: Loading layer [==================================================>] 102.8MB/102.8MB
f9aa914c3423: Loading layer [==================================================>] 42.2MB/42.2MB
512aec7e0a63: Loading layer [==================================================>] 13.98MB/13.98MB
718229382536: Loading layer [==================================================>] 66.05kB/66.05kB
e290d0d1d461: Loading layer [==================================================>] 2.56kB/2.56kB
3e8b7c41f18b: Loading layer [==================================================>] 1.536kB/1.536kB
ed24e244e53e: Loading layer [==================================================>] 9.728kB/9.728kB
c762c2342983: Loading layer [==================================================>] 1.106MB/1.106MB
48df6a3bf03f: Loading layer [==================================================>] 596.5kB/596.5kB
Loaded image: goharbor/prepare:v2.14.0
048116257f39: Loading layer [==================================================>] 112.3MB/112.3MB
f154ae201402: Loading layer [==================================================>] 6.979MB/6.979MB
7103bac664c9: Loading layer [==================================================>] 253.4kB/253.4kB
73b30dcd2110: Loading layer [==================================================>] 1.539MB/1.539MB
Loaded image: goharbor/harbor-portal:v2.14.0
87592cb61177: Loading layer [==================================================>] 11.62MB/11.62MB
b61ec4a12f24: Loading layer [==================================================>] 3.584kB/3.584kB
11ca2cb60a99: Loading layer [==================================================>] 2.56kB/2.56kB
2fff6be7637d: Loading layer [==================================================>] 75.23MB/75.23MB
cd68804425cb: Loading layer [==================================================>] 5.632kB/5.632kB
22e7951ad38f: Loading layer [==================================================>] 129kB/129kB
2eab5f954eb7: Loading layer [==================================================>] 209.9kB/209.9kB
b553052d8ff9: Loading layer [==================================================>] 76.36MB/76.36MB
28a8326e903d: Loading layer [==================================================>] 2.56kB/2.56kB
Loaded image: goharbor/harbor-core:v2.14.0
0c33b0e9524b: Loading layer [==================================================>] 11.62MB/11.62MB
76cbfcebe181: Loading layer [==================================================>] 3.584kB/3.584kB
3e4cc3f35f30: Loading layer [==================================================>] 2.56kB/2.56kB
4d3c846a78c9: Loading layer [==================================================>] 63.4MB/63.4MB
710f51a0bd54: Loading layer [==================================================>] 64.19MB/64.19MB
Loaded image: goharbor/harbor-jobservice:v2.14.0
7d26adb546d7: Loading layer [==================================================>] 8.661MB/8.661MB
e5dcb4c390be: Loading layer [==================================================>] 4.096kB/4.096kB
63dd40e26115: Loading layer [==================================================>] 18.96MB/18.96MB
f7d9210aac9e: Loading layer [==================================================>] 3.072kB/3.072kB
e4ba205c0e89: Loading layer [==================================================>] 39.08MB/39.08MB
e92488fc5ede: Loading layer [==================================================>] 58.83MB/58.83MB
Loaded image: goharbor/harbor-registryctl:v2.14.0
73ac7af54136: Loading layer [==================================================>] 11.62MB/11.62MB
b9937c3e3dc4: Loading layer [==================================================>] 40.22MB/40.22MB
db12238a7180: Loading layer [==================================================>] 4.608kB/4.608kB
61c440c209f7: Loading layer [==================================================>] 41.01MB/41.01MB
Loaded image: goharbor/harbor-exporter:v2.14.0
[Step 3]: preparing environment ...
[Step 4]: preparing harbor configs ...
prepare base dir is set to /data/install/harbor
WARNING:root:WARNING: HTTP protocol is insecure. Harbor will deprecate http protocol in the future. Please make sure to upgrade to https
Generated configuration file: /config/portal/nginx.conf
Generated configuration file: /config/log/logrotate.conf
Generated configuration file: /config/log/rsyslog_docker.conf
Generated configuration file: /config/nginx/nginx.conf
Generated configuration file: /config/core/env
Generated configuration file: /config/core/app.conf
Generated configuration file: /config/registry/config.yml
Generated configuration file: /config/registryctl/env
Generated configuration file: /config/registryctl/config.yml
Generated configuration file: /config/db/env
Generated configuration file: /config/jobservice/env
Generated configuration file: /config/jobservice/config.yml
copy /data/secret/tls/harbor_internal_ca.crt to shared trust ca dir as name harbor_internal_ca.crt ...
ca file /hostfs/data/secret/tls/harbor_internal_ca.crt is not exist
copy to shared trust ca dir as name storage_ca_bundle.crt ...
copy None to shared trust ca dir as name redis_tls_ca.crt ...
Generated and saved secret to file: /data/secret/keys/secretkey
Successfully called func: create_root_cert
Generated configuration file: /compose_location/docker-compose.yml
Clean up the input dir
Note: stopping existing Harbor instance ...
[Step 5]: starting Harbor ...
[+] Running 10/10
✔ Network harbor_harbor Created 0.0s
✔ Container harbor-log Started 0.4s
✔ Container registryctl Started 0.6s
✔ Container harbor-db Started 0.7s
✔ Container redis Started 0.7s
✔ Container registry Started 0.7s
✔ Container harbor-portal Started 0.7s
✔ Container harbor-core Started 1.3s
✔ Container nginx Started 44.9s
✔ Container harbor-jobservice Started 44.9s
✔ ----Harbor has been installed and started successfully.----浏览器打开输入(http://192.168.67.130)地址访问
输入默认用户名:admin
密码:Harbor12345
可以修改docker-compose.yml的重启策略实验开机自启
或者使用systemd来实现开机自启
cat > /etc/systemd/system/harbor.service << EOF
[Unit]
Description=Harbor Container
After=docker.service
Requires=docker.service

[Service]
Type=oneshot
RemainAfterExit=yes
WorkingDirectory=/data/install/harbor
ExecStart=/usr/bin/docker compose up -d
ExecStop=/usr/bin/docker compose down
TimeoutStartSec=0

[Install]
WantedBy=multi-user.target
EOF
重载,开启服务
systemctl daemon-reload
systemctl enable harbor.service && systemctl start harbor.service
4.在主Harbor上部署 harbor
在harbor01上创建用户,如下
![图片[2]-Harbor-主从搭建 – 北梦の博客-北梦の博客](https://wpstatic.b52m.cn/wp-content/uploads/2025/09/a30a855aa83bdf3123affb8eaf80696a.png)
点击确定后,右上角退出登录,然后使用新用户进行登录
新建一个项目
![图片[3]-Harbor-主从搭建 – 北梦の博客-北梦の博客](https://wpstatic.b52m.cn/wp-content/uploads/2025/09/f9d87cc42d6b685ab94e4a8113fd77d4.png)
在 docker 主机上制作镜像,上传到 Harbor
在web01上进行操作
配置docker本地仓库
vi /etc/docker/daemon.json加入以下内容
"insecure-registries": ["harbor01.my.com"]![图片[4]-Harbor-主从搭建 – 北梦の博客-北梦の博客](https://wpstatic.b52m.cn/wp-content/uploads/2025/09/1b12aba2ba497e57c8d613deb8936f00.png)
例如
{
  "registry-mirrors": ["https://dh.b52m.cn"],
  "insecure-registries": ["harbor01.my.com"]
}
保存退出重启docker服务
systemctl daemon-reload && systemctl restart docker.service登录Harbor01
[root@web01 ~]# docker login harbor01.my.com
Username: user1
Password: Aa123456
WARNING! Your password will be stored unencrypted in /root/.docker/config.json.
Configure a credential helper to remove this warning. See
https://docs.docker.com/engine/reference/commandline/login/#credentials-store

Login Succeeded
下载和上传镜像
[root@web01 ~]# docker pull busybox
Using default tag: latest
latest: Pulling from library/busybox
80bfbb8a41a2: Pull complete
Digest: sha256:d82f458899c9696cb26a7c02d5568f81c8c8223f8661bb2a7988b269c8b9051e
Status: Downloaded newer image for busybox:latest
docker.io/library/busybox:latest
[root@web01 ~]# docker tag busybox:latest harbor01.my.com/open/busybox:latest
[root@web01 ~]# docker push harbor01.my.com/open/busybox:latest
The push refers to repository [harbor01.my.com/open/busybox]
80e840de630d: Pushed
latest: digest: sha256:ebd0a6156be6cdc24c4bd1ad0e0fcb938cbdd5f8b86b15d18821f280902b6380 size: 527
[root@web01 ~]#
删除镜像,测试下载(可选)
[root@web01 ~]# docker image rm -f harbor01.my.com/open/busybox:latest
Untagged: harbor01.my.com/open/busybox:latest
Untagged: harbor01.my.com/open/busybox@sha256:ebd0a6156be6cdc24c4bd1ad0e0fcb938cbdd5f8b86b15d18821f280902b6380
[root@web01 ~]# docker pull harbor01.my.com/open/busybox:latest
latest: Pulling from open/busybox
Digest: sha256:ebd0a6156be6cdc24c4bd1ad0e0fcb938cbdd5f8b86b15d18821f280902b6380
Status: Downloaded newer image for harbor01.my.com/open/busybox:latest
harbor01.my.com/open/busybox:latest
对应的下载数也会增加
![图片[5]-Harbor-主从搭建 – 北梦の博客-北梦の博客](https://wpstatic.b52m.cn/wp-content/uploads/2025/09/c0192acbfea45684e02829a6f446a6b4.png)
5.在备Harbor上部署 Harbor
登录Harbor02的web界面,方法和Harbor01一样
创建用户
![图片[6]-Harbor-主从搭建 – 北梦の博客-北梦の博客](https://wpstatic.b52m.cn/wp-content/uploads/2025/09/a440ff881a67bd32a93c23686268fde9.png)
点击确定后,右上角退出登录,然后使用新用户进行登录
6.创建主备同步
在主端(harbor01)使用admin身份登录,新建目标端,如下
![图片[7]-Harbor-主从搭建 – 北梦の博客-北梦の博客](https://wpstatic.b52m.cn/wp-content/uploads/2025/09/a0732a1c54d7f24a876fe4858fa436d7.png)
创建复制策略,如下
![图片[8]-Harbor-主从搭建 – 北梦の博客-北梦の博客](https://wpstatic.b52m.cn/wp-content/uploads/2025/09/3abe1bd16547f9874598daa611d481d9.png)
在 docker 主机上,推送镜像到主端,测试从端是否同步成功
在web01上进行操作
[root@web01 ~]# docker pull httpd:2.4
2.4: Pulling from library/httpd
ce1261c6d567: Pull complete
aeb6d226161f: Pull complete
4f4fb700ef54: Pull complete
56926e6ce68f: Pull complete
4938babf7b43: Pull complete
307fcc49c641: Pull complete
Digest: sha256:027c678f36d3cd3dd2b44ad1e963e81be66f9eba065381c1126d3019fffeb01a
Status: Downloaded newer image for httpd:2.4
docker.io/library/httpd:2.4
[root@web01 ~]# docker tag httpd:2.4 harbor01.my.com/open/httpd:2.4
[root@web01 ~]# docker push harbor01.my.com/open/httpd:2.4
The push refers to repository [harbor01.my.com/open/httpd]
4ed3261aa08c: Pushed
664c74752319: Pushed
09c56534a346: Pushed
5f70bf18a086: Pushed
d694d07f5d65: Pushed
daf557c4f08e: Pushed
2.4: digest: sha256:3e8cf45de2b628e129f4b108152f8dce6345b71f02e45f5882e6b7d8110b0e02 size: 1572
[root@web01 ~]#
在主端(harbor01)上查看镜像
![图片[9]-Harbor-主从搭建 – 北梦の博客-北梦の博客](https://wpstatic.b52m.cn/wp-content/uploads/2025/09/b3997e0629eb274b35f00545816be7ba.png)
在备端(harbor02上查看镜像)
![图片[10]-Harbor-主从搭建 – 北梦の博客-北梦の博客](https://wpstatic.b52m.cn/wp-content/uploads/2025/09/f3dd90ee39a9f16bbb6f68cb38e51d53.png)
在从端如何看到主端同步过来的镜像,表示同步完成,Harbor主备搭建成功
7.基于dockerfile构建镜像上传Harbor仓库
构建nginx镜像并上传至Harbor仓库
创建dockerfile目录
mkdir dockerfile && cd dockerfile创建index.html文件用于验证
echo "hello nginx" > index.html拉取centos:8镜像
docker pull centos:8创建dockerfile文件
cat > Dockerfile << EOF
FROM centos:8
MAINTAINER  chenglu
RUN rm -rf /etc/yum.repos.d/*
RUN curl -o /etc/yum.repos.d/CentOS-Base.repo https://mirrors.aliyun.com/repo/Centos-vault-8.5.2111.repo
RUN yum -y install wget
RUN yum -y install nginx
COPY index.html /usr/share/nginx/html
EXPOSE 80
ENTRYPOINT ["/usr/sbin/nginx", "-g", "daemon off;"]
EOF
基于dockerfile构建docker镜像
docker build -t centos:wget .查看镜像是否构建成功
[root@web01 dockerfile]# docker images | grep centos
centos                         wget      fafc30f21415   7 minutes ago   357MB
centos                         8         5d0da3dc9764   4 years ago     231MB
上传镜像到harbor仓库
[root@web01 dockerfile]# docker tag centos:wget  harbor01.my.com/open/centos:wget
[root@web01 dockerfile]# docker push harbor01.my.com/open/centos:wget
The push refers to repository [harbor01.my.com/open/centos]
1adefd097c93: Pushed
21a1382b0996: Pushed
f6c28b09e877: Pushed
24d47607fe8a: Pushed
8a259a77b804: Pushed
74ddd0ec08fa: Pushed
wget: digest: sha256:1775258fcb1d873bc18e773e5b5c9d79e208f564eaa4a030700719fad8216fcf size: 1574
[root@web01 dockerfile]#
启动容器并查看
[root@web01 dockerfile]# docker run -d -p 8080:80 --name nginx01 harbor01.my.com/open/centos:wget
07987be770729bde12e9a398cc38d21d231451932a75259ff80d4bf069dcc9b0
[root@web01 dockerfile]# docker ps -a
CONTAINER ID   IMAGE         COMMAND                   CREATED         STATUS         PORTS                                   NAMES
07987be77072   centos:wget   "/usr/sbin/nginx -g …"   5 seconds ago   Up 4 seconds   0.0.0.0:8080->80/tcp, :::8080->80/tcp   nginx01
[root@web01 dockerfile]# curl http://127.0.0.1:8080
hello nginx
[root@web01 dockerfile]#
构建tomcat镜像并上传至Harbor仓库
创建并进入目录
mkdir tomcat8 && cd tomcat8下载 apache-tomcat-8.0.26.tar.gz 和 jdk-8u45-linux-x64.rpm 传到这个目录下
创建Dockerfile文件
cat > Dockerfile << EOF
FROM centos:8
MAINTAINER tomcat
RUN rm -rf /etc/yum.repos.d/*
RUN curl -o /etc/yum.repos.d/CentOS-Base.repo https://mirrors.aliyun.com/repo/Centos-vault-8.5.2111.repo
RUN yum install wget -y
ADD jdk-8u45-linux-x64.rpm /usr/local/
ADD apache-tomcat-8.0.26.tar.gz /usr/local/
RUN cd /usr/local && rpm -ivh jdk-8u45-linux-x64.rpm
RUN mv /usr/local/apache-tomcat-8.0.26 /usr/local/tomcat8
EXPOSE 8080
EOF
构建镜像
docker build -t="tomcat8:v1" .运行容器
docker run --name tomcat8 -itd -p 8080 tomcat8:v1进入容器并启动tomcat
[root@web01 tomcat8]# docker exec -it tomcat8 /bin/bash
[root@4bd30d03976e /]# /usr/local/tomcat8/bin/startup.sh
Using CATALINA_BASE:   /usr/local/tomcat8
Using CATALINA_HOME:   /usr/local/tomcat8
Using CATALINA_TMPDIR: /usr/local/tomcat8/temp
Using JRE_HOME:        /usr
Using CLASSPATH:       /usr/local/tomcat8/bin/bootstrap.jar:/usr/local/tomcat8/bin/tomcat-juli.jar
Tomcat started.
[root@4bd30d03976e /]# ps -ef | grep tomcat
root         39      0 25 07:06 pts/1    00:00:02 /usr/bin/java -Djava.util.logging.config.file=/usr/local/tomcat8/conf/logging.properties -Djava.util.logging.manager=org.apache.juli.ClassLoaderLogManager -Djava.endorsed.dirs=/usr/local/tomcat8/endorsed -classpath /usr/local/tomcat8/bin/bootstrap.jar:/usr/local/tomcat8/bin/tomcat-juli.jar -Dcatalina.base=/usr/local/tomcat8 -Dcatalina.home=/usr/local/tomcat8 -Djava.io.tmpdir=/usr/local/tomcat8/temp org.apache.catalina.startup.Bootstrap start
root         68     15  0 07:07 pts/1    00:00:00 grep --color=auto tomcat
打开新的终端窗口,查看刚才创建的 tomcat8 这个容器的详细信息
[root@web01 ~]# docker ps | grep tomcat
4bd30d03976e   tomcat8:v1   "/bin/bash"   About a minute ago   Up About a minute   0.0.0.0:32768->8080/tcp, :::32768->8080/tcp   tomcat8
[root@web01 ~]#
使用浏览器访问
![图片[11]-Harbor-主从搭建 – 北梦の博客-北梦の博客](https://wpstatic.b52m.cn/wp-content/uploads/2025/09/a511fd301afba594b2f6c97fbf2d3189.png)
通过这些步骤可以实现通过 dockerfile 构建 tomcat 镜像了
刚才我们在构建 tomcat 镜像时候,基于镜像运行容器,但是需要进入到容器,手动启动 tomcat 服务,
那如果想要启动容器,tomcat 也自动起来,需要按照如下方法构建镜像
cat > Dockerfile << EOF
FROM centos:8
MAINTAINER tomcat
RUN rm -rf /etc/yum.repos.d/*
RUN curl -o /etc/yum.repos.d/CentOS-Base.repo https://mirrors.aliyun.com/repo/Centos-vault-8.5.2111.repo
RUN yum install wget -y
ADD jdk-8u45-linux-x64.rpm /usr/local/
ADD apache-tomcat-8.0.26.tar.gz /usr/local/
RUN cd /usr/local && rpm -ivh jdk-8u45-linux-x64.rpm
RUN mv /usr/local/apache-tomcat-8.0.26 /usr/local/tomcat8
ENTRYPOINT /usr/local/tomcat8/bin/startup.sh && tail -F /usr/local/tomcat8/logs/catalina.out
EXPOSE 8080
EOF
cat > Dockerfile << EOF
FROM centos:8
MAINTAINER tomcat
RUN rm -rf /etc/yum.repos.d/*
RUN curl -o /etc/yum.repos.d/CentOS-Base.repo https://mirrors.aliyun.com/repo/Centos-vault-8.5.2111.repo
RUN yum install wget -y
ADD jdk-8u45-linux-x64.rpm /usr/local/
ADD apache-tomcat-8.0.26.tar.gz /usr/local/
RUN cd /usr/local && rpm -ivh jdk-8u45-linux-x64.rpm
RUN mv /usr/local/apache-tomcat-8.0.26 /usr/local/tomcat8
ENTRYPOINT ["/bin/sh", "-c", "/usr/local/tomcat8/bin/startup.sh && tail -F /usr/local/tomcat8/logs/catalina.out"]
EXPOSE 8080
EOF重新构建镜像
docker build -t="tomcat8:v2" .运行容器
docker run --name tomcat8_v2 -itd -p 8080 tomcat8:v2查看容器端口
[root@web01 tomcat8]# docker ps | grep tomcat8_v2
c7a99f36ce18   tomcat8:v2   "/bin/sh -c '/usr/lo…"   50 seconds ago   Up 49 seconds   0.0.0.0:32769->8080/tcp, :::32769->8080/tcp   tomcat8_v2
[root@web01 tomcat8]#
使用浏览器访问ip+端口即可访问成功


暂无评论内容